This guide provides essential die casting design tips for engineers balancing performance, cost, and lead time. It covers critical design geometry, tooling considerations, and finishing choices based on NADCA standards and supplier-tested best practices.
Why Die Casting Demands Smart Design
Die casting operates under higher pressure and narrower error margins than injection molding or CNC machining. This means design errors can have a significant ripple effect on tool efficiency, cycle time, and part reject rates. The correct fillet radius, uniform wall thickness, or optimal draft angle can determine the difference between an excellent, manufacturable part and a defective one.
For example, a part wall designed without sufficient draft will stick in the die. This requires excessive ejection force, which can introduce defects due to stress and slow down the manufacturing cycle.
Practical Example
An ECU housing enclosure for a Tier-2 automotive supplier was redesigned from a machined version to a die-cast one. The initial die-cast design, with inconsistent wall thicknesses and sharp 90° internal corners, resulted in an 18% reject rate and required post-machining. After revision, incorporating fillets of ≥2 mm and maintaining wall uniformity within ±0.3 mm, the reject rate dropped below 4%. This revision also doubled tooling maintenance intervals, significantly reducing overall costs and lead times.
Consider the table below for die casting design trade-offs:
| Design Choice | Impact on Reject Rate | Impact on Tool Life | Impact on Cycle Time |
| No or minimal draft | +25-35% (sticking, ejection marks) | 20-30% (higher ejection wear) | +1-2 sec (slower ejection) |
| Uneven wall thickness | +20% (sink marks, porosity) | Neutral | +3-5 sec (cooling delay) |
| Sharp internal corners | +10-15% (cracks, stress risers) | -15% (stress on die edges) | Neutral |
| Overly complex geometry | +5-10% (short shots, misruns) | -10% (increased tool wear) | +2-4 sec (slower fill) |
.
10 Die Casting Design Tips for Engineers
Die casting has many benefits, but at the same time, these advantages can quickly become drawbacks when designing risky geometries. Defects, such as shrinkage porosity, short shots, or premature tool wear, can quickly erode the process advantages.
See the table below for an overview of key geometry types and how they interact with die casting limits before presenting the 10 die casting design tips for engineers.
| Geometry Type | Die Casting Sweet Spot | Common Risk | Mitigation Strategy |
| Thin walls | 1.5-2.5 mm (Al), 1.0-2.0 mm (Zn) | Short shots, incomplete fill | Increase gate velocity or wall taper |
| Thick sections | <5 mm preferred | Shrink porosity | Use cored-out features or ribs |
| Deep bosses | ≤4x wall height | Voids, sink marks | Hollow bosses with fillets ≥0.5 mm |
| Sharp internal edges | Avoid <0.25 mm radii | Tool stress, cracking | Use internal radii ≥0.5-1 mm |
1. Select Alloys Based on Wall Thickness, Corrosion Needs, and Post-Machining Requirements
When selecting a die-casting material, it’s essential to match its unique properties—such as strength, castability, corrosion resistance, and cost—with the part’s intended function, required finishing, and any post-processing needs. This alignment is critical to prevent issues like accelerated tool wear, poor surface quality, or unwarranted increases in overall cost.
Here is a brief guide on the metal alloys to use and when to use them.
Key Alloys for Die Casting
- Aluminum Alloys (e.g., A380, A360): Choose for applications requiring weight reduction, moderate tensile strength (approximately 310–320 MPa), and good corrosion resistance, such as brackets, housings, and engine components.
- Zinc Alloys (e.g., Zamak 3, ZA-8): Ideal for high-precision, thin-walled parts, including connectors, gears, and components needing a fine cosmetic finish. Zamak 3 is specifically known for its excellent flowability in the die.
- Magnesium Alloys (e.g., AZ91D, AM60): Best suited for ultra-lightweight parts in sectors like aerospace or handheld electronics. Use AM60 over AZ91D when enhanced ductility or crashworthiness is essential.
- Copper and Brass Alloys: Recommended when high conductivity, wear resistance, or antimicrobial properties are critical. Typical uses include plumbing fixtures that face frequent corrosion or electrical terminals.
Caution: Post-Machining & Corrosion
- Machining: Avoid high-Silicon (Si) aluminum alloys for post-machined parts. Studies show tool wear can increase by 30–50% depending on feed rate and cutter type.
- Corrosion: Avoid magnesium alloys in highly corrosive environments unless they are sealed or coated, as their salt spray resistance is significantly lower than aluminum or zinc.
Die Casting Alloy Properties and Design Considerations
| Alloy | UTS (MPa) | YS (MPa) | Min Wall (mm) | Corrosion Resistance | Thermal Conductivity (W/m⋅K) | Die Temp Range (∘C) | Relative Cost (1-5) | Notes |
| A380 (Al) | 320 | 160 | 1.5 | Moderate (paint recommended) | ∼96 | 650-710 | 2 | Most used aluminum die cast alloy. Good overall performance. |
| A383 (Al) | 310 | 155 | 1.5 | Moderate–Good (paint or chromate) | ∼96 | 650-710 | 2 | Slightly better flow for intricate designs than A380. |
| A360 (Al) | 320 | 170 | 1.25 | Good (natural oxide layer) | ∼55 | 650-700 | 3 | Higher corrosion resistance; harder to cast. |
| Zamak 3 (Zn) | 280 | 210 | 0.75 | Good (plating ready) | ∼113 | 400-430 | 1.5 | Superior fluidity; excellent surface finishes. |
| Zamak 5 (Zn) | 330 | 240 | 0.75 | Moderate–Good (may require chromate) | ∼105 | 400-430 | 1.5 | Stronger but slightly less ductile than Zamak 3. |
| ZA-8 (Zn-Al) | 380 | 290 | 1.0 | Moderate (requires coating) | ∼130 | 400-460 | 2 | High wear resistance; good for load-bearing parts. |
| AZ91D (Mg) | 230 | 160 | 1.25 | Low (must be coated) | ∼72 | 600-630 | 3 | Ultra-light, brittle if uncoated; use in dry environments. |
| AM60 (Mg) | 225 | 125 | 1.5 | Low–Moderate (epoxy or anodize) | ∼96 | 600-630 | 3.5 | Better ductility and crash energy absorption. |
| Brass (CuZn) | 350-500 | 250-400 | 2.0 | High (self-passivating) | ∼120 | 700-750 | 4 | Durable, corrosion-resistant; expensive and heavy. |
| Copper Alloys | 400-550 | 250-450 | 2.0 | Excellent (natural oxide layer) | 250-400 | 700-780 | 5 | Top-tier conductivity; tool wear is significant. |
Where: UTS = Ultimate Tensile Strength; YS = Yield Strength. Relative Cost Scale: 1 = low, 5 = very high.
Corrosion Notes are based on neutral salt spray (ASTM B117) exposure and common finishing practices.
2. Maintain Uniform Wall Thickness
Wall thickness variation causes uneven cooling, leading to defects such as sink marks in thicker zones, warping due to differential shrinkage, and slower solidification.
The best practice is to maintain uniform wall thickness across the entire part. Any transitions between different thicknesses must be as gradual as possible to prevent stress concentrations and warping. Bulky sections should be optimized by coring out material.
Recommended Wall Thickness Ranges:
- Aluminum Alloys: 1.5–3.0 mm
- Zinc Alloys: 0.75–2.5 mm
- Magnesium Alloys: 1.25–2.0 mm
Increasing wall thickness from 2.5 mm to 5 mm can raise cycle time by 15–25% due to slower cooling in aluminum alloys.
Checklist:
- Wall thickness within material-specific range
- No sudden thickness changes >1.5× in adjacent zones
- Cored out thick features with ribs added
- Reviewed foundry process data for wall fill limits
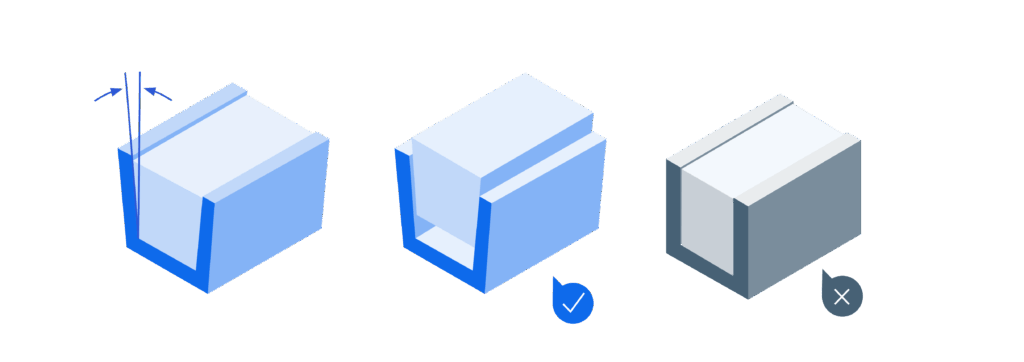
3. Add Draft Angles for Easy Ejection
Draft angles are an integral part of die casting design as they ensure clean part ejection. A proper draft angle helps protect mold surfaces and eliminate surface defects such as drag lines or galling. A zero draft angle will cause the part to stick, deform during ejection, or even damage the tool.
The best design practice is to always add a draft angle. The deeper or more textured the surface, the more draft you need
Draft Angle Formula (Rule of Thumb)
The primary rule is to add 1° of draft per 25 mm of cavity depth. For textured surfaces, add 1° draft per 0.1 mm of texture depth to avoid tearing or drag marks
Draft Angle (°) = Base Draft + (Feature Depth in mm ÷ 25) + (Texture Depth in mm × 10)
Recommended Draft Angles
| Surface Type | Feature Depth (mm) | Surface Texture | Recommended Draft (°) |
| External wall | <25 | Smooth (Ra < 1 µm) | ≥ 1° |
| Internal cavity | <25 | Smooth | ≥ 2° |
| Deep cavity | 50 | Smooth | 3-4° |
| Any surface | N/A | Textured (0.1 mm deep) | +1° per 0.1 mm texture |
| Fine texture (light matte) | N/A | ~0.05 mm texture | +0.5° |
*Applicable to aluminum die casting with a standard surface finish, unless otherwise specified.
Checklist:
- External walls: ≥ 1° (or more for deep features)
- Internal cavities: ≥ 2° minimum
- Additional draft added for surface textures
- Verified draft on bosses, logos, ribs, and undercuts
- Used CAD macro to apply defaults across all features
4. Fillets and Rounds: Eliminate Sharp Corners
Sharp internal or external corners are critical design flaws. They act as stress risers, disrupt the flow of molten metal, and accelerate die wear under high-pressure injection .The primary design fix is to use fillets and round corners to ensure smooth transitions.
Why Fillets and Radii are Critical:
- Sharp corners increase local stress by 2 to 3 times, significantly compromising the integrity of fatigue-loaded parts.
- Abrupt changes in geometry cause turbulent metal flow, increasing the risk of defects like cold shuts or air traps.
- Sharp internal edges on the part translate to sharp edges on the die cavity. These edges are prone to thermal fatigue, accelerating die degradation and potentially cutting tool life by up to 30%
- Use compound radii for complex rib networks or junctions of ribs and walls. Fillet both the rib base and its junction with the wall for smoother metal flow.
Fillet Sizing Formula:
Minimum Internal Radius (mm) = 0.5 × Wall Thickness + 0.25 mm
Minimum Radius Guidelines (scaled to wall thickness)
| Location | Minimum Radius | When to Increase |
| Internal corners | ≥ 0.75 mm or 0.5 × wall thickness + 0.25 mm | For thicker walls or load-bearing parts |
| External corners | ≥ 1.0 mm | If machined later or polished |
| Rib-to-wall junction | 1.0-1.5 mm + compound blend | Always use compound fillets to avoid cold shuts |
Checklist:
- Internal corners ≥ 0.75 mm (or use formula)
- External corners ≥ 1.0 mm
- Rib-to-wall transitions have compound fillets
- Avoid zero-radius junctions in all load paths
- Checked fillet size compatibility with tool radius
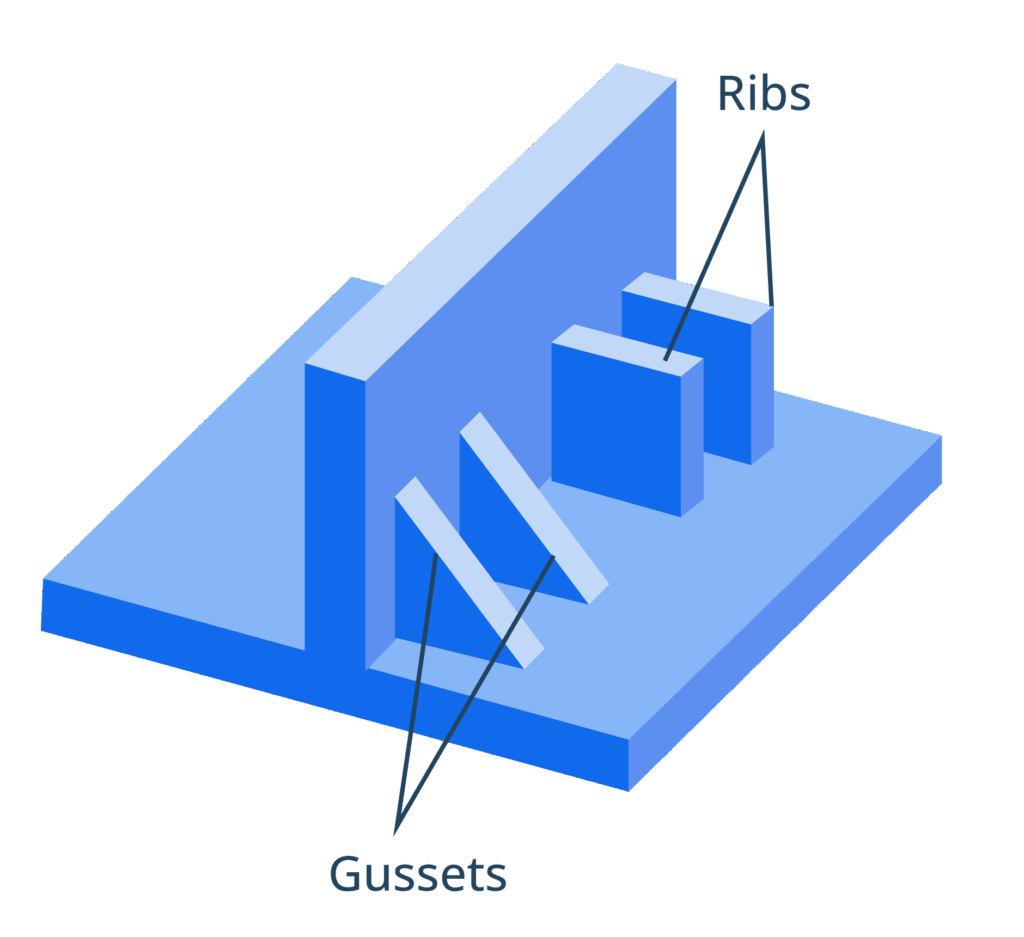
5. Rib and Boss Design for Strength Without Bulk
Ribs and bosses are essential features used to reinforce die-cast parts, effectively improving stiffness and reducing warping without using excessive material. However, if not designed properly, these features can introduce defects like sink marks, shrinkage porosity, and longer cooling times .
Smart rib and boss design improves part stiffness, reduces warping, and speeds up production. For example, reinforcing a cover plate with ribs instead of thickening walls can reduce the cycle time by 12% due to faster cooling.
Rib Design Guidelines
| Feature | Recommended Value | Notes |
| Rib thickness | 0.5-0.7 × wall thickness | Thicker ribs trap heat and cause sink marks |
| Rib height | ≤ 2.5 × rib thickness | Taller ribs = diminishing stiffness returns + risk of mis fill |
| Draft angle | ≥ 1° | Aids ejection; increase to 1.5-2° for deep ribs |
| Rib spacing | ≥ 3 × rib thickness | Prevents heat buildup and improves metal flow |
Checklist:
- Maintain a base fillet radius ≥ 1 mm
- Tie bosses to ribs or walls; avoid isolated bosses
- Core out to prevent sinks and reduce cooling time
6. Ejector Pins, Parting Lines, and Tooling Considerations
Ejector pins and parting lines are unavoidable elements of die casting tooling. It is paramount to place them out of sight or align them with non-critical features to avoid ruining cosmetics or function.
Design Guidelines:
| Parameter | Recommended Value / Action | Notes |
| Placement | Keep off Class A surfaces or high-wear areas. | Minimal visibility and impact. |
| Spacing | ~25-75 mm apart depending on part size | Dependent on part size and structure. |
| Pad Diameter | ≥ 1.2 × pin diameter to distribute force | Required to distribute force and prevent pin punch-through. |
| Surface Landing Zones | Add flat pads for textured or cosmetic areas. | Helps minimize witness marks and prevents pin push-through on thin walls. |
| Draft in Pin Areas | ≥ 0.5° to ensure clean release | Ensures clean release of the pin from the part. |
Parting Line Design Strategy:
| DO (Best Practice) | DON’T (Common Flaw) |
| Place parting lines along sharp edges, underside faces, or assembly breaks to minimize visibility. | Parting lines across smooth or visible faces. |
| Use natural geometry transitions to mask parting seams. | Abrupt transitions that magnify line misalignment. |
| Use parting lines to simplify die pull and avoid unnecessary side actions. | Thin shut-offs that can flash or wear early. |
| Ensure equal draft split from the parting line (e.g., 1.5° above and below) for balanced ejection. | Overly complex parting geometry, which adds cost and risk of mismatch. |
| Add trim stock zones (~0.2–0.4 mm) in flash-prone areas to aid post-processing. | Interrupting fine textures or logos with parting lines; ruins surface continuity |
Tooling Reference Table
| Feature | Typical Value | Notes |
| Ejector pin diameter | 4–8 mm | Common for small/medium parts. |
| Parting line offset | ± 0.15 mm | Typical witness mismatch; depends on alignment controls. |
| Shut-off min. width | ≥ 1.5 mm | Wider for zinc, can be slightly tighter for aluminum. |
Checklist:
- Ejector pins located on non-cosmetic faces or bosses
- Pin pads are large enough (1.5 times dia) to prevent deformation
- Parting line placed on non-functional, low-visibility surfaces
- Draft angles split correctly relative to the parting line
- Trim stock added to flash-prone areas if necessary
7. Post-Processing Considerations
Not all part features can be die-cast. Features such as threads, tight-tolerance bores, and undercuts often require post-processing. The location of the feature should be considered to minimize the amount of material that needs to be removed. Knowing what to cast and what to machine can save time, reduce scrap, and improve tolerance control .
Design Guidelines for Post-Processing
| Feature Type | As-Cast Tolerance (mm) | Post-Machined Tolerance (mm) | Notes |
| Simple bosses/slots | ±0.2 – ±0.3 | ±0.05 – ±0.1 | Depends on alloy and part size. |
| Flat sealing faces | ±0.25 | ±0.05 | Use stock allowance +0.25 mm for machining. |
| Threaded holes | N/A | Standard tap tolerance | Cast-in inserts or post-tap recommended. |
| Holes for dowels | ±0.3 | ±0.02 – ±0.05 (reamed) | Typically drilled post-casting. |
- Threading is typically post-machined, and undercuts require cores or slides.
- For bores, a tolerance of ±0.1 mm is typical, but machining stock is recommended for tighter fits.
Checklist:
- Add machining stock (+0.25 mm) to critical surfaces
- Allow a tolerance of ±0.1 mm for simple dimensions; looser for complex geometries
- Specify a “machining allowance” zone in the 3D model and 2D drawing
- Use cast-in inserts for threaded holes to eliminate tapping operations
8. Design Windows and Holes
Openings, such as windows and holes, are often present in die-cast parts for weight reduction, ventilation, fastener clearance, and aesthetics. Proper placement is critical; poorly placed holes can lead to core breakage, flash formation, or costly post-machining .
Hole Design Guidelines by Alloy (As-Cast)
| Alloy Type | Min Hole Ø (Depth ≤ 3×Ø) | Max Aspect Ratio (as-cast) | Min Wall Between Holes | Notes |
| Aluminum A380 | 1.5 mm | 4:1 | 1× hole Ø | Add draft ≥1° for side walls |
| Zinc Zamak 3 | 1.0 mm | 5:1 | 0.8× hole Ø | Finer detail, softer tooling |
| Magnesium AZ91D | 2.0 mm | 3:1 | 1× hole Ø | Lower strength cores, more prone to breakage |
Consider the following for proper window and hole placement in die casting design:
- Avoid sharp-edged holes or windows, as they cause localized die wear and stress risers. Instead, use generous fillets (≥ 0.5 mm) at edges to reduce core stress and improve metal flow .
- Avoid unsupported small cores (< 1.5 mm diameter) or reinforce them if necessary.
Checklist:
- Maintain edge distances ≥ 1x wall thickness to prevent weak bridges
- Use ≥ 1° draft on cored holes; increase to 2-3° for deep windows
- Align hole axis with die draw direction to avoid side-actions
- Avoid high aspect ratio holes (depth > 3x diameter) to prevent core breakage
- Ensure ribs between holes are ≥ 1 mm to prevent flash or incomplete fill
9. Surface Finish and Cosmetic Grades
The function and cosmetics of die-cast parts are affected by the surface finish level. Consumer-facing areas or visible sections demand polishing or coating, and the finish level applied, in turn, affects cost, dimensional tolerance, and post-processing time.
For instance, powder coating can add +0.05-0.10 mm per face, which requires you to adjust tolerances accordingly.
Die Casting Surface Finish Grades
| Grade | Typical Ra (µm) | As-Cast Condition | Post-Processing | Use Case |
| Grade 1 — Utility | 6.3-12.5 | Visible defects acceptable | None or protective coating only | Internal parts, non-visible brackets |
| Grade 2 — Functional | 3.2-6.3 | Minor blemishes allowed | Spot polishing or painting | Mounting plates, heat sinks |
| Grade 3 — Commercial | 1.6-3.2 | Uniform surface, minor tool marks | Zinc plating, powder coat, anodizing | Structural but semi-visible parts |
| Grade 4 — Consumer | 0.8-1.6 | No visible defects, cosmetic requirements | Custom painting, bead blasting | Enclosures, decorative housings |
| Grade 5 — Superior | < 0.8 | Microfinish required on select zones | Polishing, vapor honing, multi-stage coatings | Sealing faces, o-ring seats, premium casings |
- Match finish to function. Consider a utility finish for internals and a high-grade finish for cosmetic faces.
- Isolate critical surfaces that need post-process polish; mark them as “Machining Required” in CAD.
- Use consistent grain patterns or masking for visible zones.
Checklist:
- Specified Ra value matched to grade (e.g., Ra <= 3.2 µm for visible faces).
- Avoided over-finishing tight bores, which can widen diameters outside tolerance.
- Ensured paint build-up on mating surfaces will not cause assembly interference.
- Avoided unnecessarily specifying Grade 4/5 across the entire part to control cost.
10. Design Trade-Offs and Real-World Scenarios
Die casting involves inherent trade-offs regarding cost, complexity, performance, and lead time. For instance, adding structural ribs improves stiffness but can complicate tool design and increase ejection force. You must balance manufacturability and function by evaluating design decisions in context.
Understanding these trade-offs allows you to make smart compromises depending on volume, tolerance needs, and budget
Design Decision Matrix
| Design Choice | Tool Complexity Change | Piece Price Impact (Approx.) | Production Risk |
| Add Core Pin | +1 insert, minor EDM cost | ↓ machining time by ~20% | Core pin breakage during ejection |
| Cast-in Threaded Insert | + insert setup | ↓ post-op cost by ~$0.30/unit | Risk of misalignment in mold |
| Post-Machined Bore | None (basic mold) | ↑ secondary cost (~$0.50/part) | Requires fixture setup, adds lead |
From Design to Cast Part
Optimizing a design for die casting is a balance of geometry, tooling constraints, and material science. By applying these ten practical tips—from maintaining uniform walls to strategic parting line placement—you ensure your parts are not only manufacturable but also cost-effective and high-performing.
Ready to elevate your designs? For ongoing learning, discussions, and exclusive content, we invite you to join the Xometry Pro community.
 Europe
  Türkiye
  United Kingdom
  Global

 Login with my Xometry account
  0
0









Comment(0)