Measuring Shore hardness is a widely used technique for assessing the hardness of materials such as rubber, plastics, and elastomers. Unlike other hardness testing methods like Rockwell or Brinell, which are designed for metals and harder materials, Shore hardness testing specifically measures the resistance of more flexible materials to indentation. This makes it particularly valuable in applications where properties like flexibility, elasticity, and impact resistance are essential.
The term “hardness” refers to a material’s ability to resist indentation or localised deformation, often quantified using an instrument called a durometer. The Shore hardness scale measures this property, providing a numerical value that indicates how much force is required to create an indentation in the material.

Shore Hardness Scales: Shore A, Shore B and Shore OO
Shore hardness scales are designed to measure the hardnesses of various materials—typically plastics and rubbers, in compliance with ISO 48-4 or ASTM D2240. Shore hardness is a versatile technique for measuring hardness, from very soft materials like thermoplastic elastomers (TPEs) and soft rubbers to very hard materials like thermoplastics and thermosets. The two most commonly used durometer scales are Shore A and Shore D. The hardness values in both scales range from 0 to 100 and are empirically based on the indentation depth of the test.
Though not as commonly used, the Shore OO scale is also a durometer scale used to measure the hardness of materials. The Shore hardness scale to be used depends on the material and is largely dependent on the type of test the user would like to use.
Shore A vs. Shore D: What Are the Differences?
The primary differences between the Shore A and Shore D scales lie in the type of indenter and applied force used to conduct the tests and the materials intended to measure. These differences are crucial for selecting the appropriate Shore hardness durometer test procedure and scale.
| Feature | Shore A | Shore D |
| Material type | Softer, more flexible materials (e.g. rubbers, silicones, soft elastomers, TPEs, TPU) | Harder, more rigid materials (e.g. rigid plastics like ABS, PC) |
| Indenter type | Conical tip for softer materials | Sharper point for penetrating harder materials |
| Scale range | 0 to 100 | |
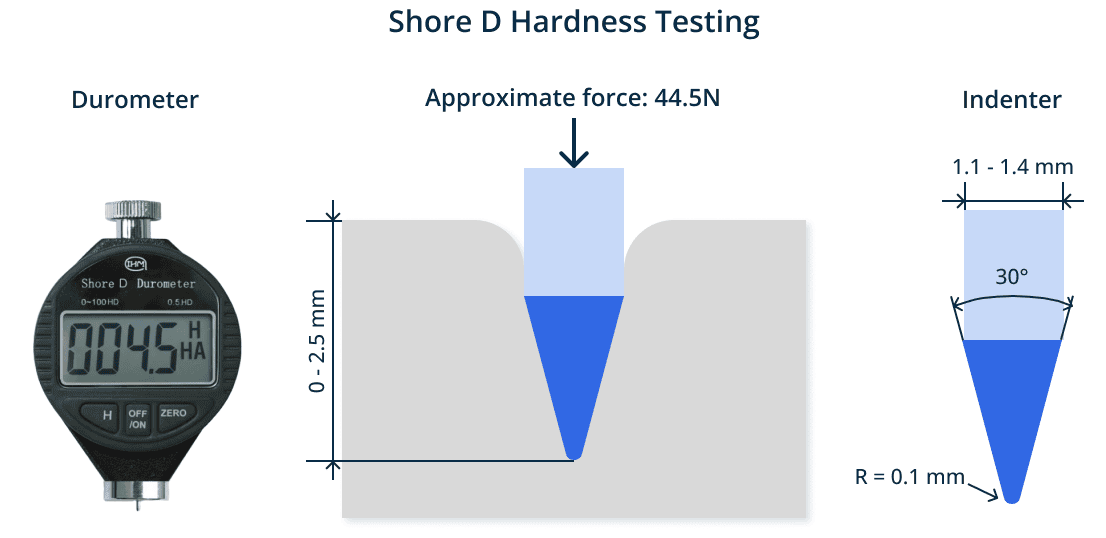
| Force applied | Approximately 8 N | Approximately 44.5 N |
| Best use case | Measuring materials requiring flexibility and elasticity | Measuring materials requiring rigidity and toughness |
| Applications | Seals, gaskets, shoe soles, flexible consumer products | Hard hats, garden hoses, rigid plastic components |
Shore Durometer Conversion Chart
There is some overlap between the two scales, where either Shore A or Shore D can be used to determine and report the hardness of a single material. For instance, a material with a hardness of 100 Shore A is equivalent to about 60 Shore D, while a material with a hardness of Shore 10 D is equivalent to about 70 Shore A.
The table below shows the approximately equivalent values for Shore A and Shore D scales:
Despite these overlaps, it is important to use the same scale when comparing different materials, to be able to effectively quantify a material’s hardness, performance, and quality.
Shore A Hardness Scale
Shore A measures the hardness of softer, more flexible materials such as elastomers, silicones, and rubbers. The indenter for Shore A has a conical tip, which is suitable for penetrating softer materials. The Shore A durometer applies an approximate 8 N force onto a material using a 35° conical head.
Common Materials Measured with Shore A Hardness
Shore A hardness is a measure used to quantify the hardness of flexible and soft materials. It’s especially relevant for materials like rubbers, silicones, thermoplastic elastomers (TPEs), and softer thermoplastics and thermosets.
| Type of Material | Material Example | Shore A Hardness | Common Applications |
| Silicone | True Silicone | 20 – 60 | Seals, o-rings, kitchen utensils, medical implants |
| Silicone | Silicone elastomers | 20 – 70 | Automotive applications, food-grade products, medical devices |
| Rubber | SIL 30 | 35 | Automotive gaskets, medical devices, kitchenware, seals |
| Rubber | EPU 40 | 72 | Industrial parts, seals, gaskets |
| TPE (Thermoplastic elastomer) | TPU (Thermoplastic polyurethane) | 85 – 95 | Footwear, hoses, industrial belts, cable jackets, sports equipment |
| TPE (Thermoplastic elastomer) | TPV (Thermoplastic vulcanisates) | 50 – 80 | Automotive seals, weather strips, soft-touch grips |
| Softer Thermoplastic / Thermoset | LDPE (Low-density polyethylene) | 95 | Squeeze bottles, plastic bags, tubing |
| Softer Thermoplastic / Thermoset | PVC (Polyvinyl chloride), flexible grade | 50 – 90 | Flexible hoses, inflatable products, cable insulation |
| Softer Thermoplastic / Thermoset | Epoxy resins | 60-85 | Flooring, coatings, adhesives |
Example of Applications
The table below shows the Shore A hardness of some familiar items:
| Product | Shore A Hardness |
| Rubber band | 20 A |
| Bottle nipple | 40 A |
| Pencil eraser | 55 A |
| Shoe sole | 70 A |
| Leather belt | 80 A |
| Tire tread | 80 A |
| Golf ball | 90 A |
Shore D Hardness Scale
Shore D measures the hardness of harder, more rigid materials, including hard plastics and harder elastomers with little flexibility. The indenter for Shore D has a sharper point measured from the horizontal compared to the Shore A indenter, which allows it to penetrate harder materials due to the smaller area over which the force of the indenter is applied. To test for Shore D durometer, a 44.5 N force is applied onto a material using a 30° conical head.
Common Materials Measured with Shore D Hardness
The Shore D scale is often used to measure the hardness of more rigid plastics and elastomers such as vulcanised rubber, hard TPEs, and thermoplastics like ABS, PC, PVC, and more.
| Type of Material | Material Example | Shore D Hardness | Common Applications |
| Rigid Plastic | ABS | 70 – 85 | Automotive components, electronic housings, consumer products (e.g., toys like LEGO bricks) |
| Rigid Plastic | PC (Polycarbonate) | 70 – 85 | Eyewear lenses, safety helmets, protective shields |
| Rigid Plastic | Acrylic / PMMA | 70-80 | Windows, skylights, signage |
| Rigid Plastic | PVC (Polyvinyl chloride), rigid grade | 80-90 | Pipes, fittings, window frames, building materials |
| Hard Elastomer | Vulcanized rubber, hard grade | 50-75 | Automotive tires, belts, industrial seals |
| Hard Elastomer | Hard TPEs | 55-75 | Tool handles, automotive components, caster wheels |
| Thermoset Plastic | Epoxy resins | 75-90 | Coatings, adhesives, electrical encapsulation, composite materials |
| Composite Material | Carbon fiber composites | 80-90 | Aerospace, automotive, sports equipment, high-performance applications |
Examples of Applications
The table below shows the Shore D hardness of some common objects:
| Product | Shore D Hardness |
| Shoe sole | 10 D |
| Garden hose | 30 D |
| Hard Book cover | 40 D |
| Wooden ruler | 70 D |
| Hard hat | 80 D |
How to Measure Shore Hardness?
The Shore hardness measurement procedure is described in the four steps below:
- Place the test sample on a hard, flat, or rigid surface. Apply pressure to the durometer quickly and steadily, avoiding any sudden impacts or shocks.
- Take hardness measurements at specified intervals. Record the readings at 3 seconds and then at 15 seconds.
- Measure the hardness at five different points on the test sample to account for any variations. Calculate and record the average of these measurements.
- If the needle on the durometer has penetrated the plastic to its maximum depth and the device is pressed firmly against the material, the needle will indicate the material’s hardness value on the scale.
The hardness value is displayed on a scale ranging from 0 to 100 and is determined by the amount of pressure needed to form an indentation at a particular depth. Materials with higher Shore hardness values have higher hardnesses. However, it’s important to note that a higher Shore hardness does not necessarily mean a material is more durable or better performing in all applications. Hardness is just one aspect of a material’s properties; other factors like flexibility, impact resistance, and tensile strength also play critical roles in determining overall performance.
Troubleshooting Tips for Inaccurate Shore Hardness Readings
Achieving accurate and reliable readings is essential for making informed decisions in material selection and product design, but various factors can contribute to inaccurate measurements or material-specific challenges. Here are some troubleshooting tips to help you ensure consistent and precise Shore hardness readings:
- Ensure proper calibration of the Shore hardness durometer: Regularly calibrate your durometer using a standard reference block to ensure accurate readings, as an improperly calibrated device can lead to misleading hardness values and impact material selection and quality control. Keep the durometer clean and well-maintained; check for wear on the indenter tip and other parts, and replace any worn components promptly to maintain measurement precision.
- Prepare the material surface properly: Ensure the material’s surface is clean, smooth, and free of contaminants or debris to avoid inaccurate readings. The test sample should be flat and sized according to testing standards (e.g., ASTM D2240-15). If the material has a coating or surface treatment, remove it or choose an area that reflects the material’s true bulk properties to prevent false hardness readings.
- Use the correct shore scale: Choose the appropriate Shore scale (Shore A or Shore D) for the material being tested to avoid inaccurate readings. Be mindful of materials that fall within overlapping hardness ranges and select the scale that best matches the material’s properties and application requirements.
- Account for material-specific characteristics: Not all materials are suitable for Shore hardness testing. Extremely hard or soft materials may fall outside the scales’ effective range, and some materials, like soft elastomers, can recover from indentation too quickly, resulting in inconsistent or inaccurate readings. To improve accuracy, take multiple measurements and calculate an average. Additionally, ensure that samples meet the minimum thickness requirements—typically at least 6 mm—to avoid skewed results due to inadequate material thickness for proper indentation.
- Apply proper testing technique: Apply the durometer with steady, consistent pressure, avoiding sudden impacts or jerky movements that could lead to inaccurate readings. Maintain the correct dwell time (typically 1 to 15 seconds) and record measurements consistently to reduce variability. Test multiple points on the material to account for inconsistencies and natural variability, especially in composites or mixed materials. Averaging these readings will yield a more reliable overall hardness value.
Hardness Testing Results for Reliable Material Performance
Understanding the differences between Shore A and Shore D hardness scales is crucial for selecting the right materials for your specific applications. By mastering Shore hardness testing techniques, choosing the correct scale, and troubleshooting common issues, engineers and designers can ensure optimal material performance, quality, and durability in their products. Remember, Shore hardness is just one piece of the puzzle—consider it alongside other material properties for the best results.
 Europe
  Türkiye


Comment(0)